title: “Bitwarden SSH Agent” source: “https://bitwarden.com/help/ssh-agent/#tab-linux-6VN1DmoAVFvm7ZWD95curS" author: published: created: 2026-05-08 description: “This article provides a guide to setup and use the Bitwarden SSH Agent.” tags:
- “clippings”
SSH Agent
Bitwarden Password Manager desktop app can act as an SSH Agent to securely encrypt and store your SSH (Secure Shell) keys for use with:
- Authenticating to servers
- Signing Git commits
- Interacting with SSH based services
The Bitwarden SSH Agent will organize and protect your keys in one secure location. SSH keys can be accessed with the desktop app, web app, browser extension, and mobile app. SSH keys can be generated using the desktop app, web app, and browser extension.
note
The SSH Agent requires release version 2025.1.2 or newer.
Storing an SSH key
New SSH keys can be created and saved in the Bitwarden desktop app. Bitwarden SSH keys will store:
SSH keys stored in the Bitwarden Password Manager will have access to Bitwarden features such as folders, favorites, master password re-prompt, notes, cloning items, attachments, and custom fields.
Create new SSH key
Create a new SSH key using the Bitwarden desktop app, web app, or browser extension. Once created, SSH keys stored in Bitwarden can be accessed from the desktop app, web app, browser extension, and mobile apps.
- Select the New button and choose SSH key as the item type:
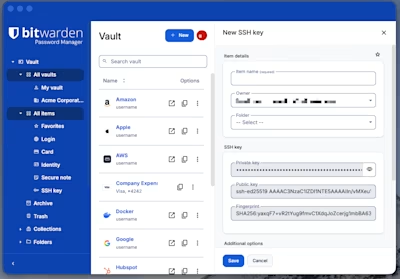 Create new SSH key on desktop
note
At this time, Bitwarden can only generateED25519type SSH keys. - Fill in remaining details such as Name and select the Save icon once complete.
Organization SSH keys
SSH keys can be created and stored in an organization collection. Organization members with appropriate permissions may create, manage and access SSH keys owned by an organization. Learn more about collection permissions here.
To add a new shared SSH key to the organization vault:
- On the Vault view of the desktop or web app, select the New button and select SSH key.
tip
Organization owners, admins, and some custom users can also take this step directly from the Admin Console to skip some of the steps in this process. - Using the Owner dropdown, choose the organization you want this item to be owned by.
- Using the Collections dropdown, choose the collection(s) to share this item with.
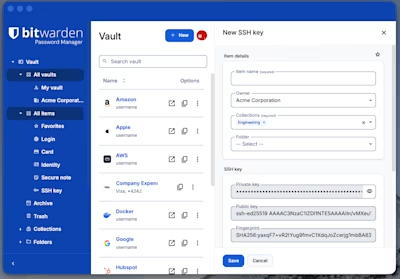 Share an SSH key
note
In general, resources that use SSH keys can support per-user keys. We recommend reviewing SSH key best practices before sharing SSH keys to an organization.
Edit existing keys
Once an SSH key has be saved in your Bitwarden vault, you may edit some of the key fields such as name, owner, folder and custom fields:
To edit SSH keys on the Bitwarden desktop app:
- Open the Bitwarden desktop app and navigate to SSH keys.
- Locate the SSH key you wish to edit and then select Edit.
- Once you have completed the desired changes, select Save.
Import key to Bitwarden
The import function for SSH keys is available on the Bitwarden desktop app. Using the Bitwarden desktop app:
- Select the New button and choose SSH key as the item type.
- Copy the existing SSH key you wish to import into Bitwarden.
- Use the Import key from clipboard icon. This will automatically paste the SSH key into Bitwarden.
- At this time, imported keys must be in OpenSSH or PKCS#8 format.
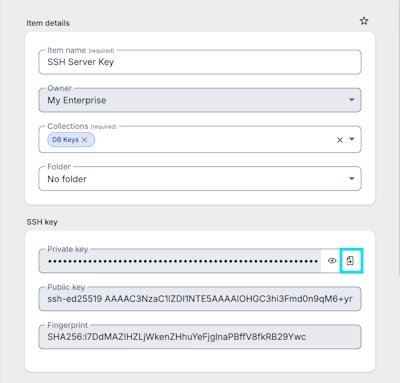 Import an SSH key
- At this time, imported keys must be in OpenSSH or PKCS#8 format.
note
At this time, imported SSH keys from Putty are not compatible.
Configure Bitwarden SSH agent
In order to use Bitwarden as your primary SSH Agent, you will be required to configure your SSH client to communicate with Bitwarden for authentication.
Enable the Bitwarden SSH Agent on Linux:
- Configure the
SSH_AUTH_SOCKvariable to point to the Bitwarden SSH Agent socket. The following example demonstrates how to do this after replacing<user>with your username:Plain Textexport SSH_AUTH_SOCK=/home/<user>/.bitwarden-ssh-agent.sock
Shell configuration
- Access your
.bashrcor.zshrcfile:Plain Textnano ~/.bashrc nano ~/.zshrc - Set the environment variable in the
.bashrcor.zshrcfile:Plain Textexport SSH_AUTH_SOCK=/home/<user>/.bitwarden-ssh-agent.sock
Snap and Flatpak
Enable the Bitwarden SSH Agent on snap or Flatpak installations:
- Configure the
SSH_AUTH_SOCKvariable to point to the Bitwarden SSH Agent socket. The following example demonstrates how to do this after replacing<user>with your username:Plain Text# Snap export SSH_AUTH_SOCK=/home/<user>/snap/bitwarden/current/.bitwarden-ssh-agent.sock # Flatpak export SSH_AUTH_SOCK=/home/<user>/.var/app/com.bitwarden.desktop/data/.bitwarden-ssh-agent.sock
Enable SSH agent
To enable the SSH Agent on your Bitwarden desktop app, navigate to Settings and Enable SSH agent.
After enabling SSH agent, you may also adjust the Ask for authorization when using SSH agent setting. This setting will determine when Bitwarden will require you to authorize access to an SSH key:
- Always
- Never
- Remember until vault is locked
Always will be selected by default.
Testing SSH keys
Once the SSH Agent has been configured for Bitwarden, we can test the setup by requesting an SSH list:
Plain Textssh-add -L
This will return a list of SSH keys saved in your Bitwarden desktop client.
note
When accessing an SSH key, the behavior of Bitwarden will differ depending on the locked or unlocked status of the client.
- Locked vault: If your Bitwarden vault is locked, Bitwarden will automatically prompt you to unlock your vault in order to gain access to the SSH key.
- Unlocked vault: If the desktop vault is unlocked, you will be prompted to confirm the SSH key usage.
Use SSH key to authenticate with Git
SSH can be used to authenticate with Git. The Bitwarden SSH Agent can add security and ease of use to your Git workflows. In this example, the Bitwarden SSH Agent will authenticate to GitHub.
- On your GitHub account, setup an SSH key by navigating to Settings, SSH and GPG keys, then select New SSH Key.
- On the add new SSH key screen, add a Name, select a Key type. Choose
Authentication Key. Copy & paste the Public key from your Bitwarden vault into the Key field on GitHub. - Once you have completed all of the fields, select Add SSH key to save the key. GitHub will request you verify your GitHub account before the key is saved.
- Test the GitHub SSH key in your terminal, for example if you are using macOS:
Plain Textssh -T git@github.com - If successful, Bitwarden will prompt you to verify the access request. Select Authorize to confirm. If successful, you will receive a message verifying the authentication attempt:
Plain TextHi <USER>! You've successfully authenticated, but GitHub does not provide shell access.
Authenticate with git repositories
Use the Bitwarden SSH Agent to sign SSH Git commits. Before using the Bitwarden SSH Agent to sign Git commits, your system will require:
- Git version 2.34 or newer. Check your Git version with:
Plain Textgit --version - OpenSSH version 8.8 or newer. Check version with:
Plain Textssh -V - Bitwarden desktop client with SSH Agent enabled.
Configure Git for SSH signing
Configure your Git environment to point to your SSH key for signing. To complete this you may set global variables or establish the instructions in your .gitconfig file.
Set global variables
To configure Git settings using --global variables:
- Set Git to use SSH for signing:
Plain Textgit config --global gpg.format ssh - Specify the SSH key to use as the signing key. To use the Bitwarden SSH Agent, replace
<YOUR_PUBLIC_KEY>with the public key copied from the SSH key saved in your Bitwarden vault.Plain Textgit config --global user.signingkey "<YOUR_PUBLIC_KEY>" - Enable automatic commit signing.
Plain Textgit config --global commit.gpgsign true
Set.gitconfig file
To configure Git using a .gitconfig file:
- Access
.gitconfigwith your preferred text editor:Plain Textnano ~/.gitconfig - Add the following configurations:
Bash[gpg]
        format = ssh
[user]
        signingkey = "<YOUR_PUBLIC_KEY>"
        name = <USER_NAME>
        email = <USER_EMAIL>
[commit]
        gpgsign = true
note
For Windows users:
- Add the
core.sshCommandvariable to your Git config to use Microsoft OpenSSH:
Alternatively, set variable in yourPlain Textgit config --global core.sshCommand "C:/Windows/System32/OpenSSH/ssh.exe".gitconfigfile:Plain Text[core] sshCommand = C:/Windows/System32/OpenSSH/ssh.exe - Next, you may be required to set the
gpg.ssh.programparameter:Plain Textgit config --global gpg.ssh.program "C:/Windows/System32/OpenSSH/ssh-keygen.exe"
Sign Git commits
Using SSH to authenticate with Git can add security and ease of use to your workflow. Similarly, SSH keys stored in Bitwarden can be used to sign and verify Git commits using SSH protocol. In this example, the Bitwarden SSH Agent will be used to sign Git commits to GitHub.
- On your GitHub account, setup an SSH signing key by navigating to Settings, SSH and GPG keys, then select New SSH Key.
- On the add new SSH key screen, add a Name and select a Key type, Choose
Signing Key. Copy & paste the Public key from your Bitwarden vault into the Key field on GitHub. - Configure git to use the
allowedSignersFilewith the following command:Plain Textgit config --global gpg.ssh.allowedSignersFile "$HOME/.ssh/allowed_signers" - Add your public key to the allowedSignersFile:
Bash# Create allowed_signers file touch ~/.ssh/allowed_signers # Edit the allowed_signers file and add a line for your public key pair you wish to trust, for example: User1@Bitwarden.com ssh-ed25519 <Your_Public_Key> - Use the SSH key to clone your repository with SSH method:
Plain Textgit clone git@github.com:<USER>/<repository>.git - Create the Git commit using terminal or your preferred text editor:
Plain Textgit commit -m "This commit is signed using SSH" - Bitwarden will prompt you to authorize the key usage:
- Once authorized, the SSH key will be initiated to approve the commit. You may now push the commit:
Plain Textgit push - You may verify your commit on Github by navigating to GitHub commits:
SSH Agent forwarding
SSH agent forwarding allows a remote server you are accessing to authenticate to other servers using your keys, without exposing your private keys outside of your vault. The server you are logged in to can request your local Bitwarden instance to authenticate to the remote server. In this example, we will demonstrate transferring files between servers:
- To begin, make sure the SSH agent has been enabled on your Bitwarden desktop app by navigating to Settings and Enable SSH agent:
- Create a new SSH key or import and existing SSH key to your Bitwarden desktop app.
- Activate agent forwarding by opening a connection with the server you wish to send files to:
Plain Textssh -A <HostnameA> - Send a file to the server:
Plain Textrsync -avzP ./TEST.txt <USER>@<HostnameB>:/home/<USER>/test.txt - Bitwarden will prompt you to approve the SSH key access. This will show that the SSH key has been requested and used to complete the file transfer.